This site contains affiliate links to products, and we may receive a commission for purchases made through these links.
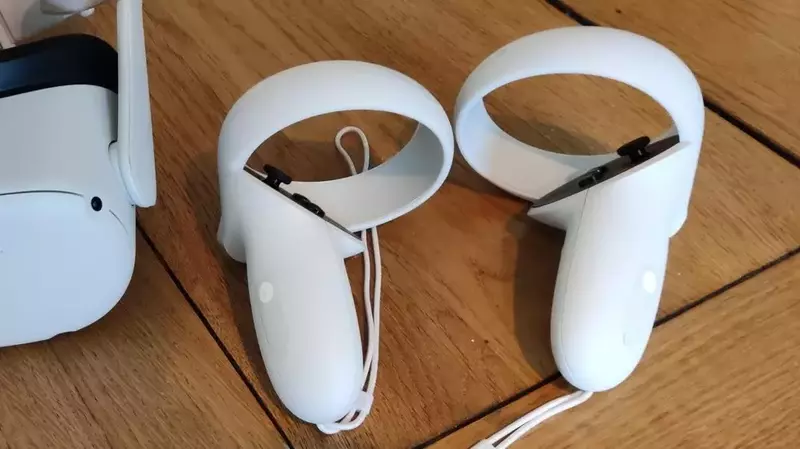
The Meta Quest 2 controllers require batteries to function. Each controller uses one AA battery. While this will give you good battery life, they will eventually run out of juice, and you will have to replace them. You may be wondering, “How can you open Meta Quest 2 controller and change batteries?”
To open the Meta Quest 2 controllers, you have to first locate the eject symbol on the palm grip of the controller. After finding it, press down and hold to open the battery compartment. You can then take out the old batteries and put in new ones.
In this blog post, I will be discussing how to open the Meta Quest 2 controllers and change the batteries. This process is not difficult, but it is important to follow the correct steps to avoid damaging your controllers. Let’s get started!
How to Open Meta Quest 2 Controller
You need to follow the steps below to successfully open the Meta Quest controller:
Step 1: Locate the Eject Symbol
Look for the arrows on the front side of each controller to see where the cover will open. These are rare and may take some effort to track down. It’s perfectly OK if you can’t.
The Quest 2’s battery compartment is positioned on the bottom side of the controller, just under the joystick.
You’ll notice that the grip of your controller has a line that’s a gap if you look closely. The battery cover is located on the left portion of the grip.
Step 2: Press and Hold the Eject Button
Press down and hold the eject button for around two seconds once you have found the eject button. Doing this will cause the cover to pop open. You can now access the batteries.
If using your hands isn’t working, you’ll likely need to bring in the big guns. In most circumstances, a common kitchen knife will work. There are various reasons why the compartment might be blocked, but a basic butter knife could help.
Simply insert the knife (or any other thin, solid object) and gently pry the compartment. Remember that you don’t need to use much power to make it happen. To access the compartment, twist the knife around to relax the hold.
READ MORE! Are Meta Quest 2 Controllers Rechargeable? (Solved!)
How to Change the Batteries of the Meta Quest 2 Controller
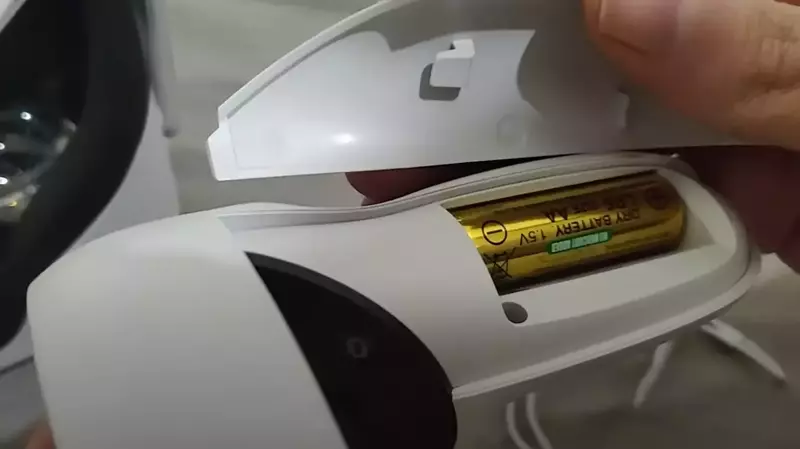
Once you have opened the battery compartment, remove the old batteries and insert new ones. Make sure that you put the new batteries in with the correct orientation. If you do not, the controller will not work correctly.
Before removing the battery from the controller, take note of where it is located.
This way, you’ll know exactly where to put the new battery. After you have inserted the new batteries, close the compartment and make sure that it is firmly shut. You can now use your controller again.
Here’s a brief guide to AA batteries in case you’re not sure:
- The bottom is the flat rounded side.
- Pin side equals top.
- You need to press the bottom of the battery into the battery slot first, where the spring resides.
- At the opposite end of the slot, the top snaps into place.
It is important to note that you should only use AA batteries in the Meta Quest controllers. Do not attempt to use any other type of battery as this could damage your controller.
Reasons for Changing the Meta Quest 2 Controller Battery
There are a number of reasons why you might need to change the batteries in your Meta Quest controller.
Batteries Running Low
If you notice that your controller isn’t working as well as it used to, it is probably time to change the batteries. This is especially true if the controller seems to be losing power quickly.
Damaged Batteries
Another reason to change the batteries is if they are damaged in some way. If you notice that the batteries are leaking, you will need to replace them as soon as possible.
Old Batteries
Even if the batteries are not damaged, they will eventually stop working. After a certain amount of time, you will need to replace them even if they seem fine.
Keep Your Controller in Good Condition
Even if you don’t use your Quest often, it’s good to keep fresh batteries in the controllers. The controller’s firmware will continue to draw power from the batteries, even when they are not in use.
Over time, this can lead to reduced battery life and performance. To avoid this, it is recommended that you change the batteries in your controllers every few months.
If you notice that your controller’s performance is deteriorating, it is likely time to change the batteries. Some symptoms of this include:
- The controller feels unresponsive or laggy.
- The joystick seems stuck or unresponsive.
- The controller regularly disconnects from the headset.
It is generally recommended that you change the batteries in your controller every six months or so. This will ensure that your controller is always working properly.
FAQs
How do I open and change batteries in my Meta Quest 2 controller?
Is there another option for replacing batteries in the Meta Quest 2 Controller?
What if I can’t remove the batteries from the controller?
!! For more information about the different VR headsets on the market, check out this product specification list.
Final Thoughts
Changing the batteries in your Meta Quest controller is a fairly simple process. However, you have to be careful not to damage the compartment by using too much force when removing or inserting the batteries.
Be sure to use only AA batteries in your controller, as other types of batteries could damage it.
I hope this article has helped you learn how to open and change batteries in your Meta Quest 2 controller.

Espen
Espen is the Director of PursuitMeta and has written extensively about Virtual Reality and VR Headsets for years. He is a consumer product expert and has personally tested VR Headsets for the last decade.


Leave a Reply