This site contains affiliate links to products, and we may receive a commission for purchases made through these links.
Meta Quest 2 has been out for a while, and it’s a great VR headset. But one thing that can be a bit annoying is that it can be quite blurry. You may wonder how to make Meta Quest 2 less blurry.
There are a few things that you can do to make Meta Quest less blurry. These include:
- Adjust headset and straps
- Adjust PC’s power management settings
- Utilize Oculus debug tool
- Change texture sizes
- Check for dirty and defective lenses
- Adjust the interpupillary distance settings
- Adjust the refresh rate
- Try wearing glasses with your Oculus
In this blog post, I will discuss ways to make the Quest 2 less blurry and improve your overall experience.

8 Ways To Make Meta Quest 2 Less Blurry
Read on as I discuss the various ways you can make your Meta Quest 2 less blurry in detail.
1. Adjust the Headset and Straps
The first thing you can do to improve the clarity of your Meta Quest 2 is to adjust the headset and straps. This will help ensure that the lenses are properly aligned with your eyes.
To do this, simply loosen or tighten the side straps until the lenses align with your pupils. You may also need to adjust the top strap if needed.
2. Adjust PC’s Power Management Settings
If you’re using your Meta Quest 2 with a PC, you’ll want to ensure that the power management settings are properly configured.
To do this, open the NVIDIA Control Panel and go to “Manage power management settings.” From here, you’ll want to set the “Maximum Performance” power mode.
READ MORE! 18 Tips & Tricks For Oculus Quest 2 (You Need To Know!)
3. Utilize Oculus Debug Tool
The Oculus Debug Tool is a great way to adjust distortion curvature, encode resolution width, and encode bitrate.
To use the Oculus Debug Tool:
- Go to program files on your PC
- Oculus rift
- Support
- Oculus-diagnostics
- Then, open OculusDebugTool
From here, you can change the distortion curvature, encode resolution width, and encode bitrate settings as desired.
4. Change Texture Sizes
Another way to improve the clarity of your Meta Quest is to change the texture sizes. This can be done by going to the “Settings” tab in the Oculus Debug Tool.
From here, you’ll want to change the “Texture Size” to “Medium.”
This will improve the clarity of your headset without impacting performance too much.
5. Check for Dirty and Defective Lenses
If your lenses are dirty or defective, this can impact the clarity of your Meta Quest. Simply use a microfiber cloth and some lens cleaning solution to clean your lenses.
If you think your lenses may be defective, you’ll want to contact Oculus support.
6. Adjust the Interpupillary Distance Settings
The interpupillary distance (IPD) is the distance between your eyes. If this setting is not properly configured, it can impact the clarity of your headset.
To adjust this setting, go to the “Settings” tab in the Oculus Debug Tool.
From here, you’ll want to change the “IPD” setting to match your IPD.
7. Adjust the Refresh Rate
It’s important to keep in mind that increasing the refresh rate means increasing the render resolution because blurry images appear when the former is neglected.
To experience crisp & clear quality, I recommend you play at a lower refresh rate if your PC can’t handle the higher render resolution.
To do this:
- Open the app on your computer
- Click Devices
- Select Quest and Touch
- Click Graphic preferences
If you have a Quest and are playing on Oculus Link, setting the resolution in-game to “Original” will also reduce blurriness.
You can do this by opening the game, going to Settings, and selecting Graphics.
8. Try Wearing Glasses with Meta Quest 2
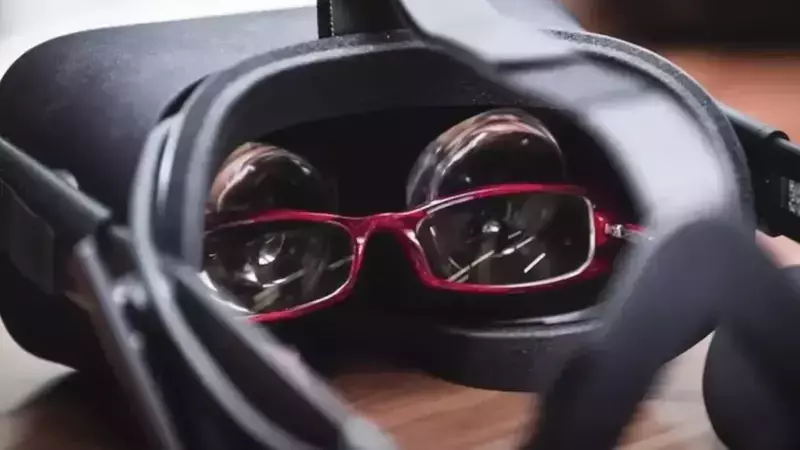
If you wear glasses, you may want to try wearing them while using your Meta Quest. This can help improve the clarity of the headset.
Even while you can wear glasses underneath almost any VR headset, no matter how nicely it fits, they will all become uncomfortable over time.
This is because both the frames and the rim of the glasses will be pressed against the bridge of your nose.
There are three alternatives to test out for individuals who use glasses with the Meta Quest 2.
You should first experiment with changing the visual settings, especially the IPD, to determine if you can still use it while wearing glasses.
You can also try inserting eyeglass spacers into the Meta Quest 2. Doing so will push the device further away from your head, giving your glasses more room to fit without slamming into your face.
The final option is to try using the gadget with your regular glasses on and no spacer.
While this might be effective for some, bear in mind that it will eventually cause discomfort when the frames’ sides press painfully into your head.
READ MORE! Do Nearsighted People Still Need Glasses In VR? (Solved)
Causes of Blurriness on Your Meta Quest 2
A few different things can cause blurriness on your Meta Quest.
1. Dirty Lenses
The most common cause of blurriness is dirty lenses. This can be easily fixed by cleaning your lenses with a microfiber cloth and some lens cleaning solution.
2. Defective Lenses
If your lenses are defective, this can also cause blurriness. If you think your lenses may be defective, you’ll want to contact Oculus support.
3. Improper IPD Settings
If the interpupillary distance (IPD) setting is not properly configured, this can also cause blurriness. The IPD is the distance between your eyes.
To adjust this setting, go to the “Settings” tab in the Oculus Debug Tool and change the “IPD” setting to match your IPD.
4. Wrong Head Position
Sometimes, your Meta Quest is blurry because it’s not positioned correctly on your head.
Make sure you adjust the head straps so that the headset fits snugly and securely on your head.
5. Low Refresh Rate
If you’re playing at a low refresh rate, this can also cause blurriness. You’ll want to increase the render resolution to improve the refresh rate.
You can do this by opening the game, going to Settings, and selecting Graphics.
!! For more information about the different VR headsets on the market, check out this product specification list.
Final Thoughts
To make your Meta Quest 2 less blurry, you need to adjust the IPD setting, clean the lenses, and make sure the headset is positioned correctly on your head.
You may also need to increase the render resolution to improve the refresh rate.
I hope this article has helped you fix the blurriness issue on your Meta Quest.

Espen
Espen is the Director of PursuitMeta and has written extensively about Virtual Reality and VR Headsets for years. He is a consumer product expert and has personally tested VR Headsets for the last decade.


Leave a Reply